
How to access Google Slides
Google Slides is part of Google Drive which you can access in several ways:
From Gmail - If you are already in Gmail, you can click the “Drive” link in the black toolbar at the top.
Web address - Or you can just type in the direct address: https://drive.google.com
Once you are in Google Drive you can create a new presentation as follows:
Click the red “Create” button in the top left corner
Then click “Presentation” from the drop-down menu
Your blank presentation will now open. You can pick a theme for your new presentation, which you can change later if you wish.
You can give it a name by clicking in the “Untitled Presentation” box at the top left, and then typing in your title. You can click there a
Instead of starting from scratch, you can also take existing presentations that you have made in other programs, such as Microsoft PowerPoint, and can import and convert them into Google Docs format. Once converted into Google Docs format, you can edit and share the presentation.
From the main Google Drive screen, click the upload button next to the “Create” button in the top left.
Now click the “Files...” link
Browse to locate the file you wish to upload and click “Open”
For presentations, you can upload and convert Microsoft PowerPoint presentations of the following file types: .ppt, .pps, and .pptx
To convert the document into Google Docs format, leave the checkbox checked for “Convert documents, presentations, spreadsheets, and drawings to the corresponding Google Docs format”. If you uncheck this box, the file will be stored, but you will not be able to edit it.
Click “Start upload” to import and convert the file
Note: Depending upon how advanced your original presentation is, the converted version may lose some of its formatting and features.
Google Docs also offers a large collection of templates to use to begin your documents. This can help save time creating a presentation, such as a photo album, or just to get a new color and design theme.
The “Template Gallery” will now open. You can choose templates from your school, as well as Public templates from all over the world
You can narrow your template search by choosing document type and category, or by entering a search term
For any template you find you can click “Preview” to see a full size preview of the file
If you want to use the template, click “Use this template”
A copy of the presentation will then open up that you can edit and save for your own use
You can change to look and feel of your presentation by choosing from many pre-made themes. These will alter the backgrounds, font styles, and font colors for all your slides. To set the theme:
Click “Slide” in the top menu bar.
Choose “Change theme...” from the drop-down menu.
You will now get a window with many theme thumbnail images to scroll through.
Click on a theme and then click “OK” to apply it to your presentation.
Google Slides allows you to insert videos into your slides as long as those videos are already online through YouTube.
Click “Insert” in the top menu bar.
Then choose “Video...” from the drop-down menu
You will now get a pop-up window where you can enter your search term.
You can now scroll through the video thumbnail results to find one you would like to insert.
Click on the video you want and then click “Select”.
The video will now be placed on your slide.
You can click and drag the corner handles to resize the video.
You can click and drag the center of the video to move the video.
You can delete the video by right-clicking on it and choosing “Cut”.
Note: Currently Google Presentations only supports inserting YouTube videos. If you have a video on some other web site, you would not be able to insert it, but you could still link to it. Using the “Link” option in the toolbar you could insert the web address of the video you want into a text box. The video will not open in the slide, but will launch in your web browser when the link is clicked.
You can also insert Word Art to create more creative titles and text.
Click “Insert” in the top menu bar.
Then choose “Word Art” from the drop-down menu.
You can now type in the text you want and press “Enter”
Once the Word Art has been inserted you can modify it in many ways:
You can click and drag the corner handles to resize the Word Art.
You can click and drag the center or edge of the item to move the Word Art.
You can click and drag the circle handle to rotate the Word Art.
You can use the toolbar buttons to change the fill color, line color, line width, and line style.
Google Slides also lets you insert a wide variety of lines and shapes, which can be used on their own or can be combined into more complex drawings.
Click “Insert” in the top menu bar.
Then choose “Line” or “Shape” from the drop-down menu.
For “Line” you can choose “Line”, “Arrow”, “Curve”, “Polyline”, “Arc”, or “Scribble”.
For “Shape” you can choose “Shapes”, “Arrows”, “Callouts”, and “Equation”.
Once you choose your line or shape, now click and drag on the slide to insert and create your item.
Once the shape has been created you can change it size, location, fill color, line color, and more
Click “Insert” in the top menu bar
Then choose “Table” from the drop-down menu
From a pop-up menu you can drag your mouse to define the width and height of the table
Click when you have it the size you want, and the table will be inserted
You can click inside any of the table cells to enter text
Once you have the table created, there are many adjustments that you can make to it:
You can click and drag the corner handles to resize the table
You can click and drag the sides to move the table
You can change column widths and row heights by putting your mouse on a table grid line, then clicking and dragging to move the line
You can insert new rows and columns by clicking in a cell, then clicking “Table” in the menu bar, and one of “Insert row above”, “Insert row below”, “Insert column right”, or “Insert column left”
You can delete rows, columns, or the entire table by clicking in a cell, then clicking “Table” in the menu bar, followed by one of “Delete row”, “Delete column”, or “Delete table”
Note: Many of these functions can also be accessed by right-clicking on the table and choosing from the pop-up context menu.
When you are ready to view your presentation, simply click “View” and then “Start presentation”
The presentation will open in a new window
You can move through the slides by clicking your mouse or clicking the arrow icons in the bottom left corner
You can also jump to a specific slide by clicking the “Slide” option in menu at the bottom and choosing the slide you want
You can view the speakers notes by clicking the Options gear icon at the bottom of the screen, and then “Open speaker notes”
Although Google keeps your presentations safe on their servers, there may be times when you want to save a copy of a presentation to your local computer. For example, you may want to give a copy to a person who does not have Internet access to get to your Google presentation, or you may be doing a presentation somewhere that does not have Internet access. You can export your presentations as follows:
Open the presentation as usual in Google Docs
Click “File” in the top menu bar
Hover your mouse over the “Download as...” link in the drop-down menu
Choose the format you want to save your presentation as, including PPTX (PowerPoint format), PDF (Adobe Acrobat format), TXT (plain text), or PNG, JPEG, and SVG (all image formats).
Your file will now download to your computer
When you are ready to print your presentation, Google Docs does not print your slides directly, but instead converts the presentation into a PDF which you then can print.
Click “File” in the top menu bar, and then “Print preview”
This will open a “Print Preview” window where you can adjust settings for your print job.
In the “Slide layout” drop-down menu you can choose how many slides to put on each page, from “1 slide” to “9 slides” or “1 slide with notes” to include speaker notes.
You can choose between “Portrait” and “Landscape” for your page orientation.
You can check “Hide background” if you do not want the slides to include the background color or image.
When everything looks good, click the “Print” option at the bottom
Your presentation will now be converted into a PDF file which will then open or download depending upon your browser
With the PDF open, you can now print the file through the PDF viewer’s print option
One of the best features of Google Docs is the ability to share documents with others. You can let them just view the presentation, or you can give them the ability to edit it as well. There are several ways to share a presentation, but we will look at the two most common: sharing with specific people and sharing as a link.
How to share a document with specific people
This is a good option to use if you are sharing the document with specific people or groups of people that can entered by email address.
With the document open, click the “Share” button in the top right corner
This will open the “Sharing settings” window
At the bottom of the window there will be a box labeled “Add people:”
Click in that box and type in the people or groups that you want to share the document with. This can include individual people or groups of people identified by a Google Group email address. The address book will find matches based on what you type.
Next click the “Can edit” button to pick whether the users can edit or comment on or view the presentation
Optionally click in the “Add message” link to include directions or additional information for the recipients
Finally, click the “Save & share” button
All of the recipients will now get an email message indicating that the document has been shared with them
For individuals, the document will also automatically show up in their Google Docs list of documents.
For groups (Google Group email addresses), users will only get an email notification. Note: The document will not show up in their Docs list until they open it for the first time.
In the future you can always return to the “Sharing settings” window to change or remove people
Click the “Share” button again to return to the “Sharing settings” window.
Next to each user’s name is a drop-down to switch between “Can edit”, “Can comment”, and “Can view”
Also there will be an “X” that you can click to remove that person’s access entirely
How to share a document as a link
Instead of sharing a document with specific people, you can instead share the document with anyone who has a link to the document. This is useful when you are not sure of everyone in the target audience, or do not have an easy way to include them through an email group. In such a case you need to share a special link with these people.
With the document open, click the “Share” button in the top right corner
This will open the “Sharing settings” window.
At the top you will see “Private - Only the people listed below can access”.
Click the “Change...” link next to that line.
A new window will open up where you can change the privacy settings.
You can now pick one of five sharing settings:
“Public on the web” - Anyone can find and view the document.
“Anyone with the link” - You will get a web link for the document to share with others (through email or posting online). Anyone who has that link can click it and view your presentation.
“[your school domain]” - Anyone logged in with their school Google account can find and view the document.
“People at [your school domain] with the link” - Only people with the link who also are logged into their school Google account can view the document.
“Private” - Only you can access the document.
You can also control whether users can make changes to your document by clicking the “Access” setting at the bottom and choosing “Can view”, “Can comment”, or “Can edit”.
Click “Save” when done.
You will now return to the “Sharing settings” window but now you will have a link for the document that you can share with others.
To copy the link, click on the link to select it, then right-click and choose “Copy”.
If you need to make any changes to sharing, you can repeat the process above and choose different settings at any time.
Since the link for the document will be very long and confusing, you will need to consider how to share it with others. Options might include:
Email the link to those who need it.
Post the link on your website, blog, forum, or other online source.
Put the link inside another document and share that document (perhaps as a document with a whole list of links).
Turn the link into a QR Code, and then include the QR Code in other media. (A good QR Code generator can be found at: http://qrcode.kaywa.com/)
Use a URL shortener to make the link smaller such as: https://bitly.com/ or http://tinyurl.com/ or http://goo.gl/

If you wish to personalize your presentation more than the default themes will allow, you can insert your own background image for any of your slides.
Click “Slide” then “Background...”
You can click “Color” to pick a solid color for the background.
Or you can pick “Image” to add an image from the normal “Insert image” options.
Or you can click “Reset” to go back to the normal theme background.
After making your choice, click “Done” to change the current slide, or click “Apply to all” to change all the slides in the presentation.

The slide layout determines the general arrangement of title, text, and empty space on a slide. Of course you can always move items around and add more items later, but layouts give you a good starting point. You can change the basic layout for any slide as follows:
Click “Slide” then “Change layout”.
You can now choose between six slide layout options: Title, Title and Body, Title and Two Columns, Title Only, Caption, and Blank.
The slide will now update to the new layout.
Google Slides allows you to insert a variety of objects onto your slides including Text box, Images, Videos, Word Art, Lines, Shapes, and Tables. Below each of these options are explained.
Click “Insert” in the top menu bar.
Then choose “Text box” from the drop-down menu.
You can now click and drag your mouse to create and insert a text box.
You can click inside of the text box to enter text
You can click and drag the corner handles to resize the text box
You can click and drag the sides to move the text box
You can delete the text box by right-clicking on it and choosing “Cut”
Click “Insert” in the top menu bar
Then choose “Image” from the drop-down menu
A window will pop-up giving you six options for inserting an image
The first option: “Upload” is used to upload an image you have saved
Click the “Choose an an image to upload” button
Now browse to where you have the image saved
Select the image and click “Open”
The image will upload and be added to your slide
The second option: “Take a snapshot” lets you take a picture with your webcam and insert that into the presentation.
Just click "Take a snapshot" and grant Adobe Flash access rights to your webcam.
You will now see whatever your webcam sees and can click the "Take Snapshot" button.
Docs will hold onto the last three snapshots you take so you can pick the best one to insert.
The third option: “By URL” is used to enter the web address for the image
First, you need to have the web address for the image. Typically you do this by right-clicking on the picture you found and then choosing “Copy image URL”
Now go back to the “Insert Image” window in your Google presentation
Select the option “URL”
Right click in the box below it and choose “Paste” to insert the address
Click “Select” to insert the image onto your slide
The fourth option: “Your Albums” lets you insert images you have saved in Picasa.
Click any of your Picasa albums.
Then click on any of the pictures in the album you chose.
Click “Select” to insert the picture onto your slide.
The fifth option: “Google Drive” allow you is insert an image you have saved in your Google Drive, or that has been shared with you.
The sixth option: “Search” allows you to search several online resources for images. The sources include Google Images (public domain), Life Magazine archives, and Stock Photos (clipart).
Click in the search box and type in your search term.
Narrow down your search by type of image or color of image if you wish.
Switch between Google, Life, and Stock as needed.
Click on the image you want and then click “Select” to insert it onto your slide.
Depending upon the type of item (text box, image, table, line, shape, Word art, etc) you will have several options for modifying the item after it has been inserted into a slide. Below are the most common options:
You can click and drag the corner handles to resize the item.
You can click and drag the center or edge of the item to move the item.
You can delete the item by right-clicking on it and choosing “Cut” or by pressing “Delete” on your keyboard.
You can center the item on the slide by clicking “Arrange”, then “Center on page”, then either “Horizontally” or “Vertically”
You can rotate the item by grabbing and dragging the circle handle on the top of the item. Also you can click “Arrange”, the “Rotate”, then “Rotate right 90”, “Rotate left 90”, “Flip horizontally”, or “Flip vertically”
You can move the item in front of or in back of other items by clicking “Arrange”, then “Order”, then one of “Bring to front”, “Bring forward”, “Send backward”, or “Send to back”
Using the toolbar you can change the item’s fill color , line color
, line width
, and line style
.
You can also select multiple items at once by “Shift” clicking on each one, or by clicking and dragging your mouse around the items. With several items selected you can do the following:
You can set their horizontal alignment by clicking “Arrange”, then “Align horizontally”, then one of “Left”, “Center”, or “Right”
You can set their vertical alignment by clicking “Arrange”, then “Align vertically”, then one of “Top”, “Middle”, or “Bottom”
You can group the items together (so they become one item) by clicking “Arrange” and then “Group” (you can always ungroup them later the same way).
How add, duplicate, move, and delete slides
Your presentation will be made up of many slides, which you can add, duplicate, move or delete as needed.
Click “Slide” in the top menu bar, or just right-click on a slide thumbnail on the left side of the screen.
Choose “Delete slide” to remove the current selected slide
Choose “Duplicate slide” to make a copy of the current selected slide. The new slide is placed below the original slide.
Choose “New slide” to create a new slide.
To move a slide, simply click and drag the slide thumbnail on the left side of your screen to its new position in the presentation.
How to add animation to items

Google Slides allows you to add animations to text and images so they will appear or disappear on your slide in a predetermined order. This can be helpful to show just what you want while you are giving your presentation.
Select any text or object by clicking on it
Now click “Insert” and then “Animation” to open up the “Animations” panel on the right side of the screen.
You can choose the type of animation including “Fade in”, “Fade out”, “Fly in”, “Fly out”, “Zoom in”, “Zoom out”, and “Spin”.
You can choose when the animation occurs by choosing between “On click”, “After previous”, or “With previous”.
For text you can check the box for “By paragraph” so that the text will animate one paragraph at a time (allowing you to speak about each point before revealing the next).
You can control the animation speed by clicking a slider from “Slow” to “Fast”.
If you have multiple items animated on one slide, you can drag and drop them in the “Animations” panel to change their order.
You can click the “Play” button to preview your animations for that slide.
How to change transitions between slides
You can add transition effects between slides to make a more dynamic or creative presentation.
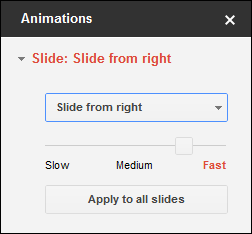
Click “Slide” then “Change transition” to open the “Animations” side panel.
At the top of the panel you can pick a transition for the entrance of the current slide (transitions apply to the entrance of a slide, not its exit).
For transitions you can choose “No transition”, “Fade”, “Slide from right”, “Slide from left”, “Flip”, “Cube”, and “Gallery”.
You can control the transition speed by clicking a slider from “Slow” to “Fast”.
If you want this transitions for all your slides, click the “Apply to all slides” button.
How to insert and edit speaker notes
When editing your presentation you can add speaker notes at any time by simply clicking and typing in the box at the bottom the screen below any slide.
You can drag the dividing bar at the top of the speaker notes box up and down to give yourself more or less room for the notes.
You can use any of the normal text formatting options for the information you type in.
During the presentation you can view the speakers notes by clicking the Options gear icon at the bottom of the screen, and then “Open speaker notes”
Note: The speaker notes will open in a new window. If you have two monitors it is useful to move your speaker notes to the other screen, or else they will display for everyone to see.
When printing your presentation check the option for “1 slide with notes” to include them in the printout.


